F-Stop: f/8
Exposure time: 1/80 sec
ISO: 200
Exposure bias: +1 step
Focal length: 55mm
Lens: Nikon AF-S 18-55mm DX G VR

F-Stop: f/8
Exposure time: 1/25 sec
ISO: 100
Exposure bias: +1 step
Focal length: 34mm
Lens: Nikon AF-S 18-55mm DX G VR

Exposure time: 1/80 sec
ISO: 200Exposure bias: +1 step
Focal length: 55mm
Lens: Nikon AF-S 18-55mm DX G VR

F-Stop: f/8
Exposure time: 1/50 sec
ISO: 200
Exposure bias: +1 step
Focal length: 55mm
Lens: Nikon AF-S 18-55mm DX G VR

F-Stop: f/6.3
Exposure time: 1/40 sec
ISO: 200
Exposure bias: +1 step
Focal length: 55mm
Lens: Nikon AF-S 18-55mm DX G VR

F-Stop: f/5.6
Exposure time: 1/100 sec
ISO: 200
Exposure bias: +1 step
Focal length: 55mm
Lens: Nikon AF-S 18-55mm DX G VR

F-Stop: f/8
Exposure time: 1/50 sec
ISO: 200
Exposure bias: +1 step
Focal length: 55mm
Lens: Nikon AF-S 18-55mm DX G VR

F-Stop: f/10
Exposure time: 1/320 sec
ISO: 100
Exposure bias: +1 step
Focal length: 55mm
Lens: Nikon AF-S 18-55mm DX G VR

F-Stop: f/8
Exposure time: 1/200 sec
ISO: 100
Exposure bias: +1 step
Focal length: 32mm
Lens: Nikon AF-S 18-55mm DX G VR

F-Stop: f/8
Exposure time: 1/125 sec
ISO: 100
Exposure bias: +1 step
Focal length: 55mm
Lens: Nikon AF-S 18-55mm DX G VR

F-Stop: f/8
Exposure time: 1/160 sec
ISO: 100
Exposure bias: +1 step
Focal length: 26mm
Lens: Nikon AF-S 18-55mm DX G VR

F-Stop: f/8
Exposure time: 1/100 sec
ISO: 200
Exposure bias: +1 step
Focal length: 22mm
Lens: Nikon AF-S 18-55mm DX G VR

F-Stop: f/5.6
Exposure time: 1/100 sec
ISO: 200
Exposure bias: +1 step
Focal length: 55mm
Lens: Nikon AF-S 18-55mm DX G VR

F-Stop: f/8
Exposure time: 1/50 sec
ISO: 200
Exposure bias: +1 step
Focal length: 55mm
Lens: Nikon AF-S 18-55mm DX G VR

F-Stop: f/5.6
Exposure time: 1/60 sec
ISO: 200
Exposure bias: +1 step
Focal length: 55mm
Lens: Nikon AF-S 18-55mm DX G VR
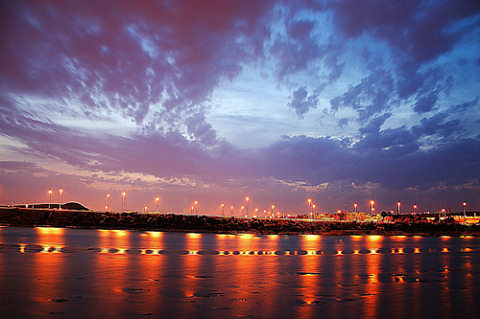
After Dark.......

F-Stop: f/5.6
Exposure time: 1/125 sec
ISO: 100
Exposure bias: +1 step
Focal length: 55mm
Lens: Nikon AF-S 18-55mm DX G VR

F-Stop: f/5.6
Exposure time: 10 sec
ISO: 100
Exposure bias: +1 step
Focal length: 55mm
Lens: Nikon AF-S 18-55mm DX G VR

F-Stop: f/3.5
Exposure time: 3 sec
ISO: 100
Exposure bias: +1 step
Focal length: 18mm
Lens: Nikon AF-S 18-55mm DX G VR